The force F is given by expression F = Acos(Bx) + Csin(Dt), where x is the displacement and t is the time. Then dimensions of are the same as that of:
1. velocity [LT-1]
2. angular velocity [T-1]
3. angular momentum [ML2T-1]
4. velocity gradient [T-1]
| 1. | pressure if \(a=1,\) \(b=-1,\) \(c=-2\) |
| 2. | velocity if \(a=1,\) \(b=0,\) \(c=-1\) |
| 3. | acceleration if \(a=1,\) \(b=1,\) \(c=-2\) |
| 4. | force if \(a=0,\) \(b=-1,\) \(c=-2\) |
The pressure on a square plate is measured by measuring the force on the plate and the length of the sides of the plate by using the formula . If the maximum errors in the measurement of force and length are 4% and 2% respectively, then the maximum error in the measurement of pressure is
1. 1%
2. 2%
3. 8%
4. 10%
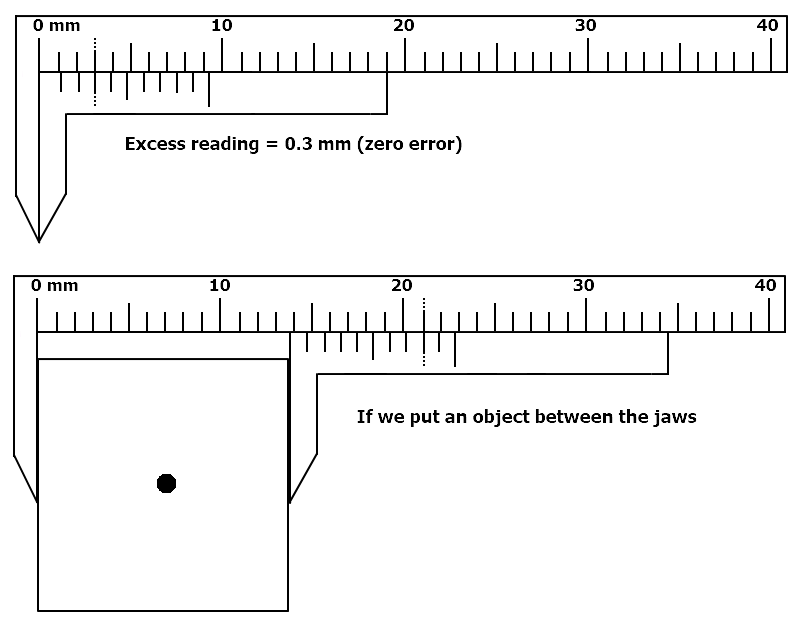
In the vernier callipers given below, \(9\) main scale divisions matched with \(10\) vernier scale divisions. Assume the edge of the vernier scale as the \('0'\) for the vernier scale. The thickness of the object using the defective vernier callipers will be:
1. \(13.3\text{ mm}\)
2. \(13.4\text{ mm}\)
3. \(13.5\text{ mm}\)
4. \(13.6\text{ mm}\)
The main scale reading is \(-1\) mm when there is no object between the jaws. In the vernier calipers, \(9\) main scale division matches with \(10\) vernier scale divisions. Assume the edge of the Vernier scale as the '\(0\)' of the vernier. The thickness of the object using the defected vernier calipers will be:
1. \(12.2~\text{mm}\)
2. \(1.22~\text{mm}\)
3. \(12.3~\text{mm}\)
4. \(12.4~\text{mm}\)
Find the thickness of the wire. The least count is \(0.01~\text{mm}\). The main scale reads (in mm):

1. \(7.62\)
2. \(7.63\)
3. \(7.64\)
4. \(7.65\)
Find the zero correction in the given figure.
1. \(0.4\) mm
2. \(0.5\) mm
3. \(-0.5\) mm
4. \(-0.4\) mm
One cm on the main scale of vernier callipers is divided into ten equal parts. If 20 divisions of vernier scale coincide with 8 small divisions of the main scale. What will be the least count of callipers?
1. 0.06 cm
2. 0.6 cm
3. 0.5 cm
4. 0.7 cm
A screw gauge has some zero error but its value is unknown. We have two identical rods. When the first rod is inserted in the screw, the state of the instrument is shown by diagram (I). When both the rods are inserted together in series then the state is shown by the diagram (II). What is the zero error of the instrument? \(1~\text{msd}= 100~\text{csd}=1~\text{mm}\)

| 1. | \(-0.16~\text{mm}\) | 2. | \(+0.16~\text{mm}\) |
| 3. | \(+0.14~\text{mm}\) | 4. | \(-0.14~\text{mm}\) |
Consider a screw gauge without any zero error. What will be the final reading corresponding to the final state as shown?
It is given that the circular head translates \(P\) MSD in \({N}\) rotations. (\(1\) MSD \(=\) \(1~\text{mm}\).)

1. \( \left(\frac{{P}}{{N}}\right)\left(2+\frac{45}{100}\right) \text{mm} \)
2. \( \left(\frac{{N}}{{P}}\right)\left(2+\frac{45}{{N}}\right) \text{mm} \)
3. \(P\left(\frac{2}{{N}}+\frac{45}{100}\right) \text{mm} \)
4. \( \left(2+\frac{45}{100} \times \frac{{P}}{{N}}\right) \text{mm}\)


